Not all hosting is created equal. Sometimes you may need additional access or features that your basic web host may not offer so you migrate to a VPS, or perhaps for privacy and control you choose to host your website from within the confines of your business or home. Whatever your reasoning to self host, access to information on how to do so and follow best practices are disjointed at best.
A Content Management System is a must for any website that grows beyond a few pages. There are many options available, however my preferred option is MODX. MODX is a fast, robust, and extensible CMS built around the GNU General Purpose License.
The following instructions are the acclimation of working through multiple sets of directions, some more complete or exact than others, along with the explanation for what each command does and why I found it necessary.
The ultimate goal of this guide will leave you with a secure LAMP serving a MODX Revolution site.
I will be using Alma Linux 9.3 as the base, though other RHEL-based distributions such as Rocky Linux should offer the same experience.
The Basic Setup
Following a clean installation, whether on bare metal, or in a virtual machine, always update the system for security and compatibility.
sudo dnf update -yRestart the system following any updates, particularly for kernel updates.
sudo reboot nowFollowing the reboot, install the epel-release package. This will supply access to the Extra Packages for Enterprise Linux.
This comes in handy for most RHEL-based installations, particularly for coding and hosting.
sudo dnf install -y epel-releaseHTTPD… Make It Show
Now that you have a basic installation of Alma Linux (or the Linux distribution of your choice), let’s show a webpage.
Install the httpd package first.
HTTPD is the service that will display the website.
sudo dnf install -y httpdNow that HTTPD is installed, we’re going to do a little prep work to allow .htaccess files to override httpd configuration.
This will be necessary for MODX to manage Friendly URLs, and gives you itemized control from the .htaccess file, which allows you to make changes to your site’s hosting without restarting the httpd service.
Edit the httpd.conf file using the editor of your choice.
I’ll use vi since it comes installed on Alma Linux, though you may find yourself more comfortable with nano or another text editor.
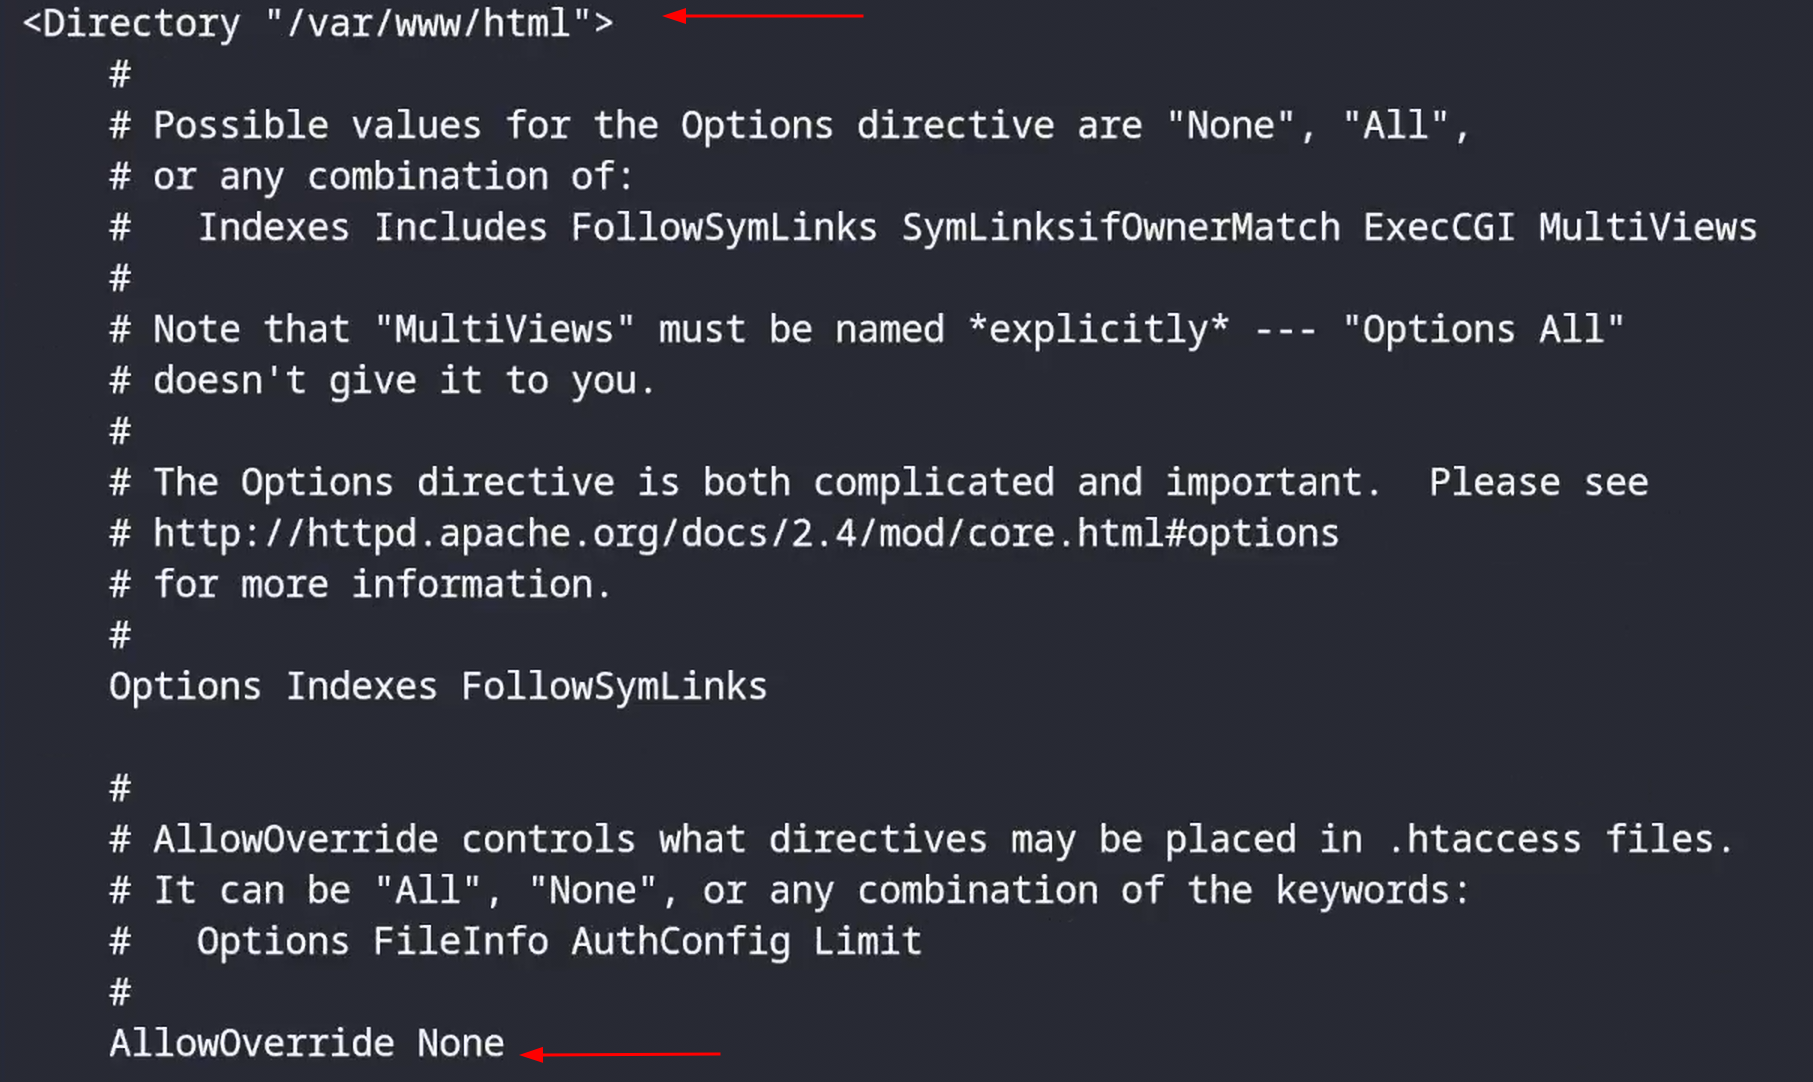
sudo vi /etc/httpd/conf/httpd.confFind the section <Directory "/var/www/html"> and change AllowOverride None to AllowOverride All, save and close the file.
Enable and start the httpd service now, but be aware it isn’t accessible yet.
sudo systemctl enable --now httpdAdd the http service to the firewall and make it permanent with the --permanent flag.
sudo firewall-cmd --add-service http --permanentReloading the firewall will allow http services to pass through the firewall, alternative you may re-run the same command as above sans the --permanent flag to add the flag temporarily to the running firewall instance.
sudo firewall-cmd --reload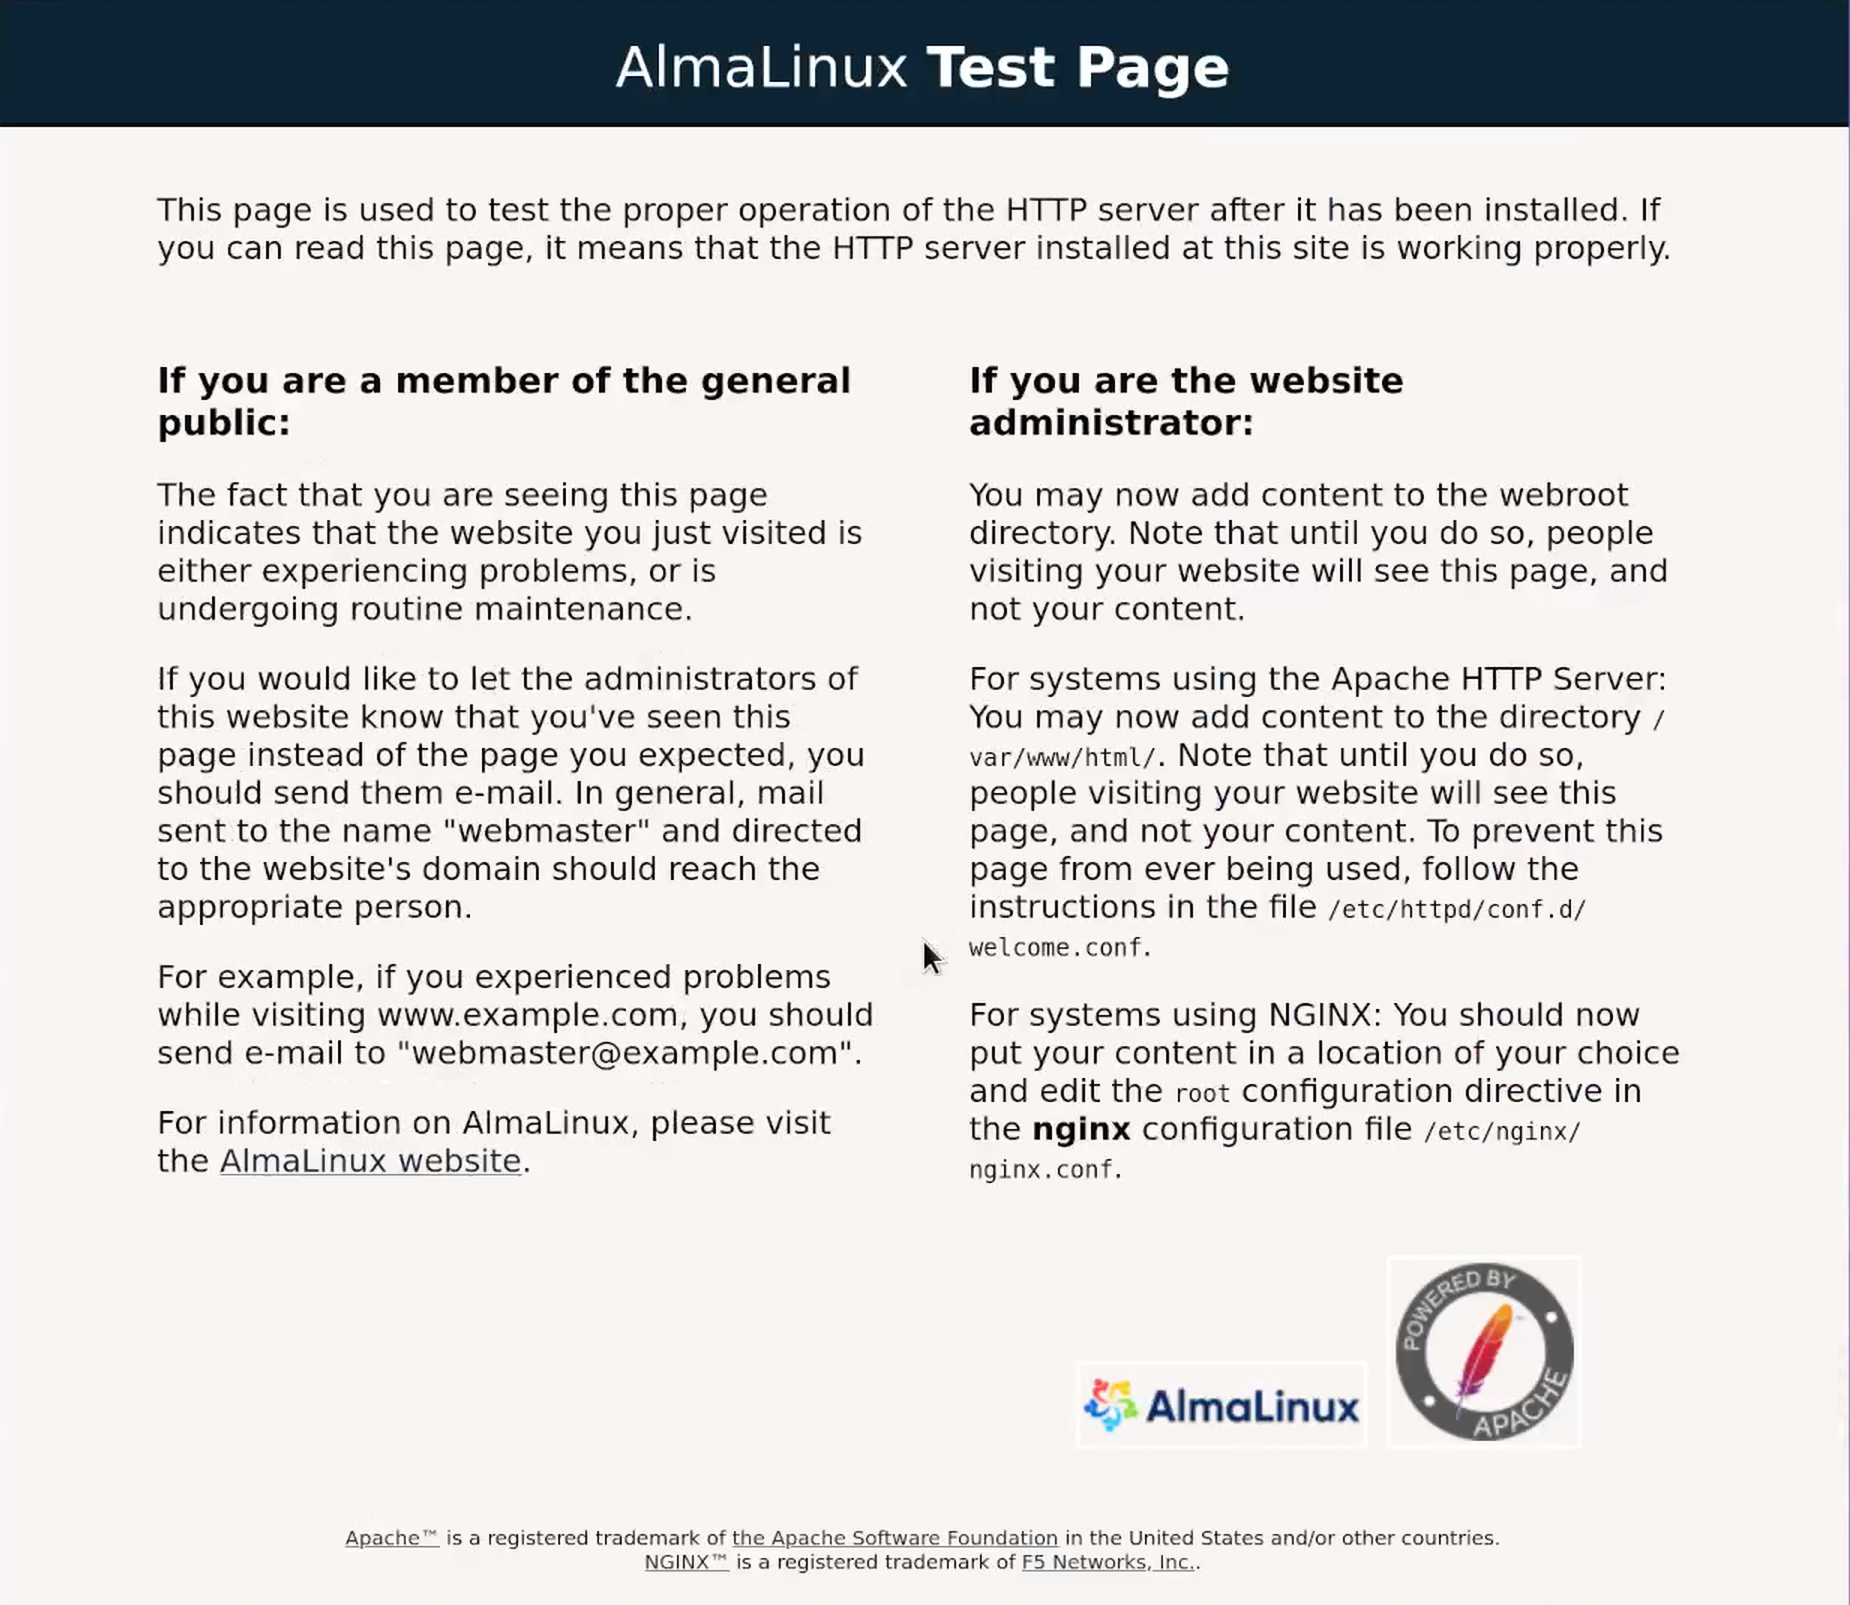
Congratulations, you are now able to view a test page!
You may now view the web page at http://{server_ip_address} or http://{server_hostname} if DNS services are available on your network.
If you don’t know your server’s IP address, you can find it with ip a.
Baby Got DB
Now that you’ve got a means to host a website, you’re in need of a database for MODX.
Install the mariadb-server package for your relational data needs.
sudo dnf install -y mariadb-serverSame as the httpd service, we will enable and start the mariadb service.
sudo systemctl enable --now mariadbNow that it is running, it needs securing. Be sure to read the prompts and answer accordingly.
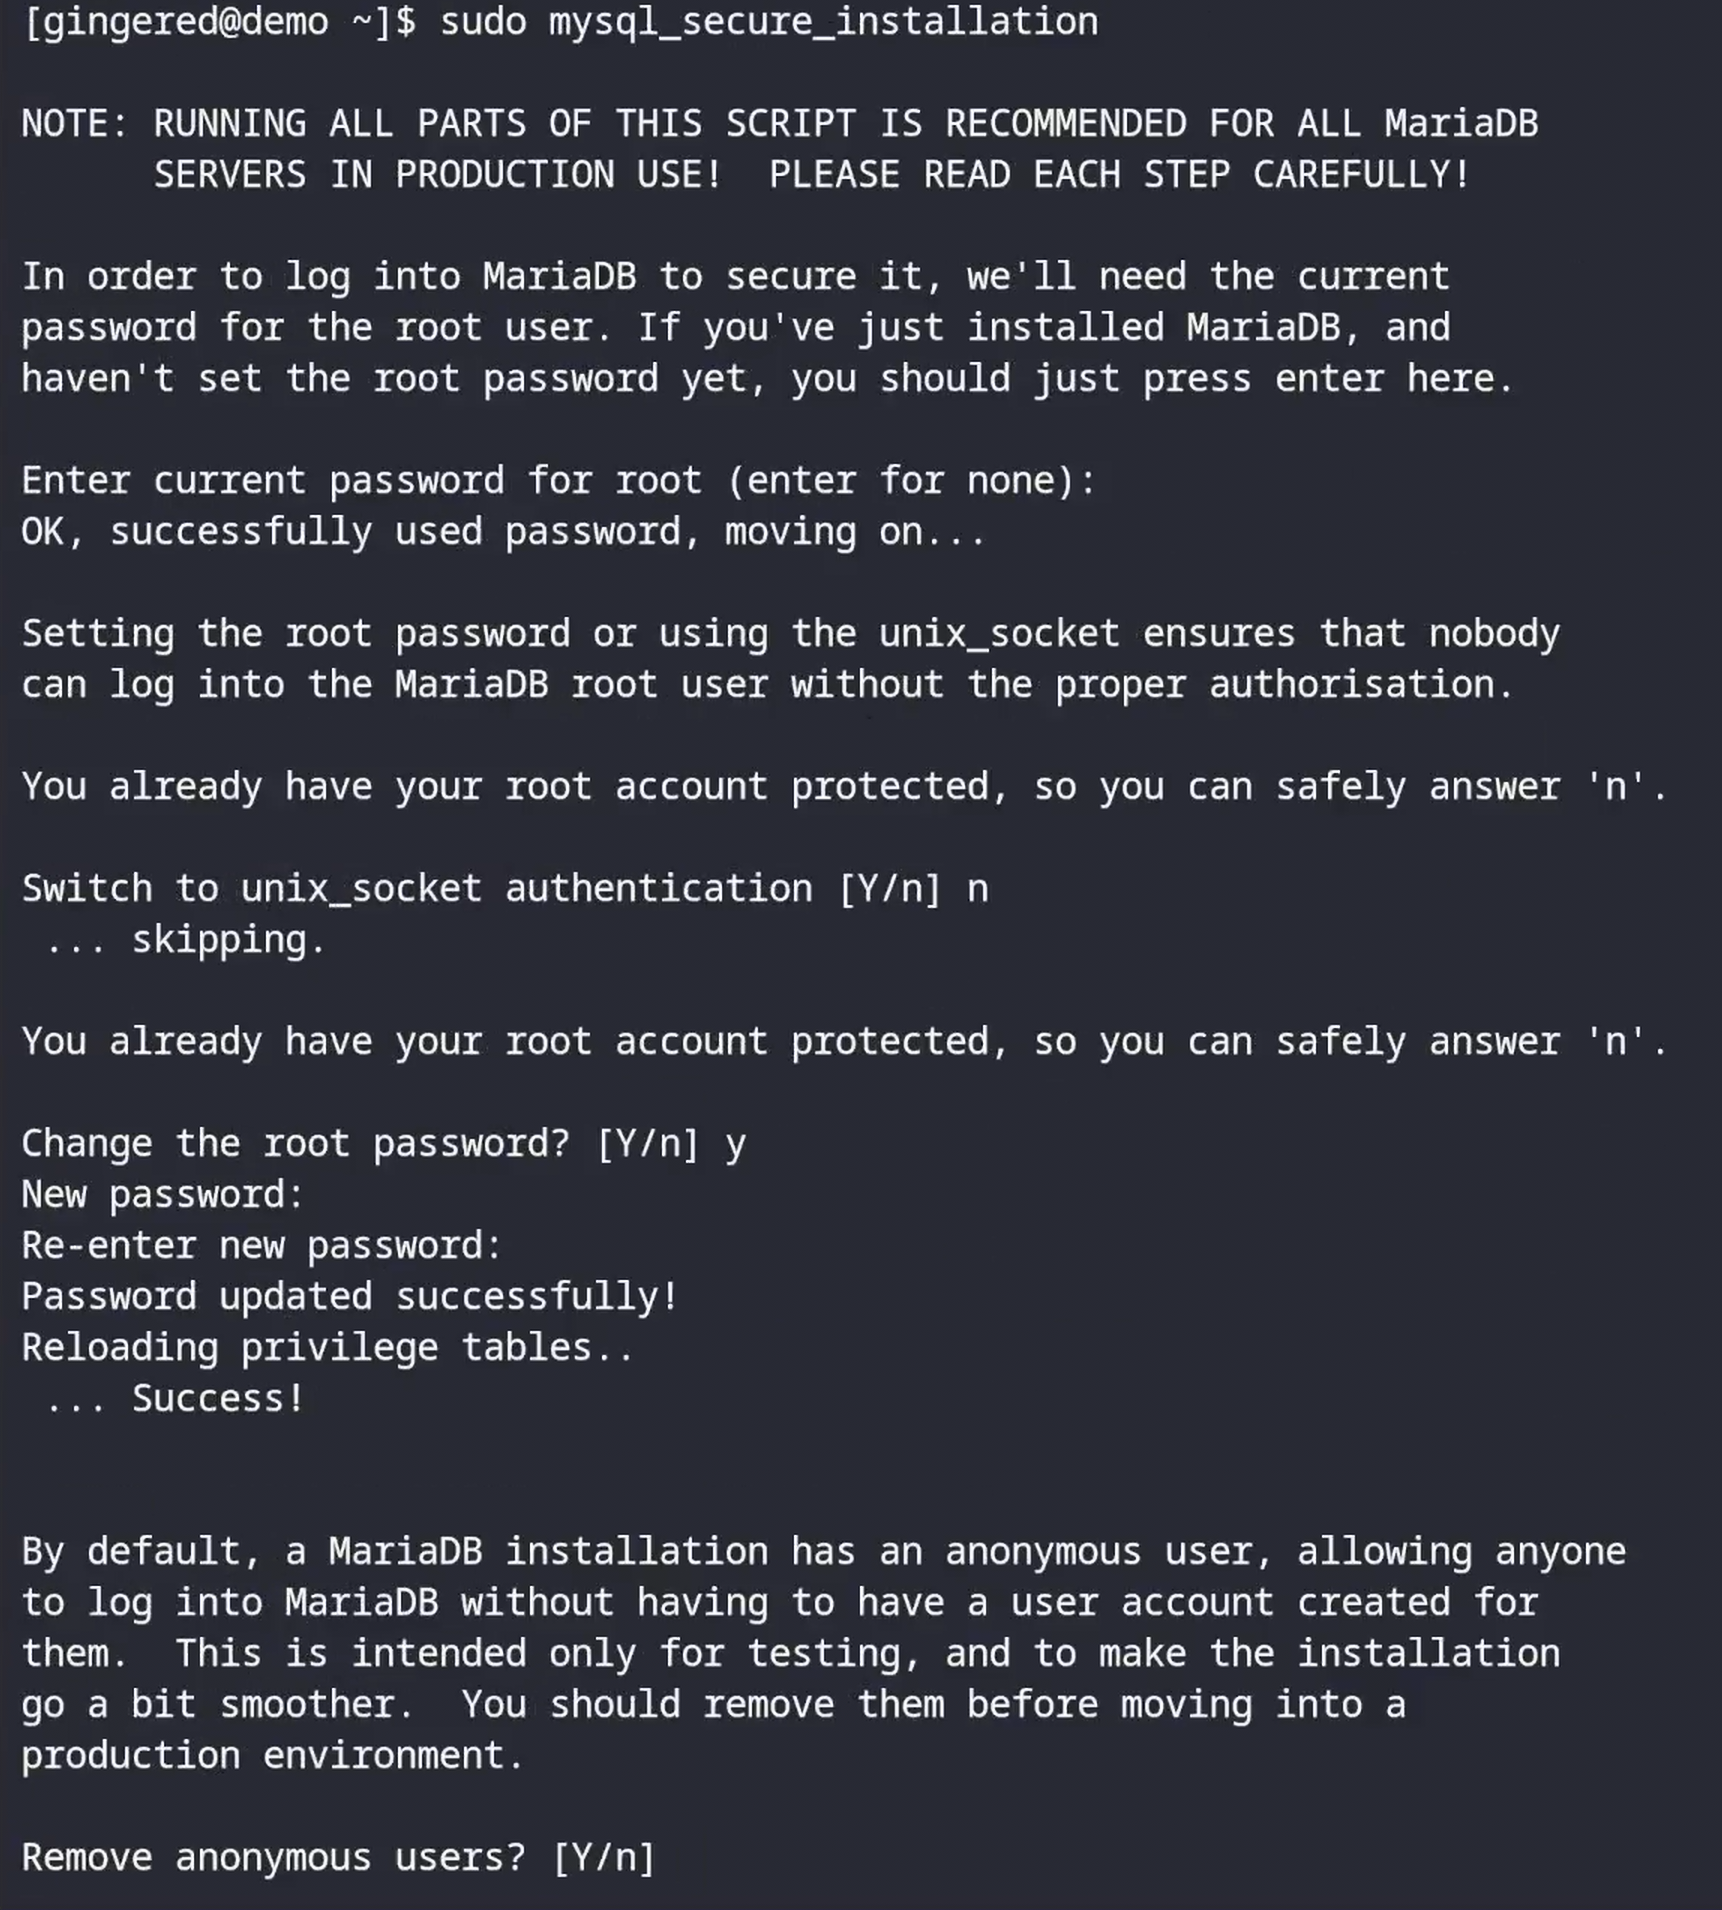
sudo mysql_secure_installationThe initial password is blank, so press enter to move past the password prompt.
Unless you have reason to otherwise, choose ‘no’ pertaining to the Unix question.
You’ll then be prompted to enter a password for the root account. I recommend using a long, generated password for this account using a service like Bitwarden or software like KeePassXC, rather than a short/easy/known password. Once the service account is set for the website you should keep the password for emergency access in the terminal, but under no circumstances should you use the root account for your website.
After the root password is set the remaining questions you should answer “yes” to unless you have reason otherwise.
Having MariaDB running and secured, we can now sign into MariaDB with the mysql command using the root account credentials.
When prompted for a password copy/paste the password you generated from KeePassXC or Bitwarden (you didn’t use the same password you use everywhere, right?).
mysql -u root -pYour website needs a database dedicated to store that data.
I would recommend calling the database by the URL of the site you’re running with the periods (.) replaced with underscores (_) for easy identification (i.e demo_ginge_red for demo.ginge.red).
CREATE DATABASE demo_ginge_red;You also need a user account that can access the demo_ginge_red database, so create one with a unique password.
The username you’ll want to be able to identify at a glance as to what it correlates to, so I’ll call it the URL with no dividers (demogingered).
You’ll also want to generate this password, which you should only need to enter for MODX once- make it a good one with KeePassXC or Bitwarden (hear a pattern?).
CREATE USER 'demogingered'@localhost IDENTIFIED BY 'uniqueGeneratedPassword';You have to tell MariaDB which database your user can read/write/modify. If you had multiple sites hosted on this server you would want multiple databases, but you don’t want each site’s database user to be able to access the other databases. This protects your sites if one were to be compromised, or if someone who had explicit access were to act malicously.
GRANT ALL PRIVILEGES ON demo_ginge_red.* TO 'demogingered'@localhost;Your database and the account are now set.
Flushing privileges in MariaDB isn’t necessary when using GRANT, however if UPDATE, INSERT, or DELETE were used it would become necessary.
Go ahead and flush anyway.
FLUSH PRIVILEGES;Aaaaaand you’re done in MariaDB. That went smoother than expected, but don’t let the confidence show too much as you sachet back out to continue on to installing PHP.
exit;Don’t Let Recursive Acronyms Get You Down, PHP Hypertext Preprocessor is Here for You
You may have noticed PHP is available in the EPEL and AppStream repositories, however we want to get it direct from the Remi’s mouth- so to speak.
Remi Collet packages PHP for Red Hat in a professional capacity, and his repo follows the Red Hat repository with some additional packages.
Install the repository for your RHEL compatible version.
I am using Alma Linux 9.3 (emphasis on “9”), so I will install remi-release-9.rpm
sudo dnf install https://rpms.remirepo.net/enterprise/remi-release-9.rpmIf you don’t know what version to install, run cat /etc/*elease to get details on your Linux installations.
Run the following command to reset the links for installing php so it doesn’t default from the AppStream or EPEL.
sudo dnf module reset phpWe want to specify which version of PHP to install for MODX. As of writing, MODX 3.0.5 calls for PHP version 7.2 or newer, however do NOT default to the minimum version. Check https://www.php.net/supported-versions.php to see which versions are current and which will continue to see support for the longest support cycle.
Specify which repo you’re taking from with php:remi-version, in this case I’ll be installing 8.3.
sudo dnf module install php:remi-8.3Once PHP is installed there are a few dependencies required for MODX. Install them, and continue on.
sudo dnf install -y php-gd php-mysql php-zipEventually you’ll need to be able to upload files to your website using MODX’s control panel.
Unfortunately you may find PHP’s upload_max_filesize of 2 megabytes too restrictive, so before it becomes an issue you should change it to something less restrictive.
You may use vi (or your editor of choice) to edit /etc/php.ini, but since I don’t like hunting through files I’ll use sed to find and replace the line that starts with upload_max_filesize = 2M and replace it with upload_max_filesize = 200M— which should be reasonably big enough for anybody, until it isn’t.
sudo sed -i "s/^upload_max_filesize = 2M/upload_max_filesize = 200M/" /etc/php.iniChanges made to php.ini require the httpd service be restarted, so do so now.
sudo systemctl restart httpdHome Stretch to Install MODX
You’ll need to be able to unzip the MODX files on the server. Alternatively you could copy the files individually, however it is a lot of files and sending them individually is a lot of starting/stopping and is quite slow in comparison.
Install zip so you can unzip.
sudo dnf install -y zipJust in case you’ve been moving around the file system, poking around, leaving your mark in strange places, let’s get back $HOME.
cd $HOME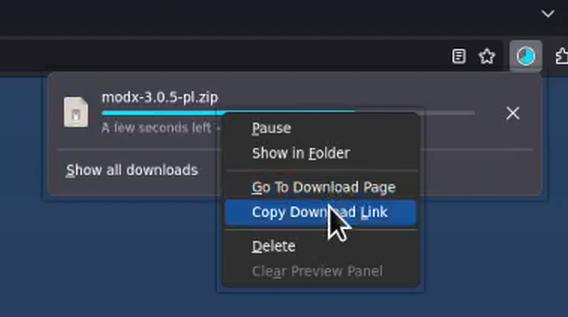
On http://modx.com find the download link using the computer you’re on, and let it start downloading- but don’t need to let it finish. Right-click on the Download in the Downloader and copy the link.
While you’re there, why not send the MODX team a donation for their hard work?
Back on the server, using cURL we’ll get the file onto the server.
Paste the link after the -0 flag, then give cURL a place to output the file with the -o flag and a filename.
curl -0 https://modx.s3.amazonaws.com/releases/3.0.5/modx-3.0.5-pl.zip -o modx-305.zipWe don’t need every file we make to be persistent across reboots, so change directories to the /tmp folder.
cd /tmpGet those file contents unzipped with the unzip command, which will put the files in the /tmp/modx-3.0.5-pl folder (or whatever folder is appropriate to the release you’ve downloaded).
unzip $HOME/modx-305.zipChange into the directory you’ve just unzipped.
cd modx-3.0.5-plNow we copy recursively (-r) the contents of the folder (./*) into /var/www/html to place the MODX CMS files where HTTPD needs them to host.
sudo cp -r ./* /var/www/htmlOn RHEL based systems HTTPD requires the files be owned by the apache user and group.
Set this recursively with the -R flag.
You may shorthand apache:apache (user:group) with apache:.
sudo chown -R apache: /var/www/htmlSetting file and folder permissions is absolutely necessary for securing your website. If you ever set your hosting permissions to ‘777’ while troubleshooting issues with your site, always remember to set them back to appropriate access after, and never do so on a public facing website.
First change the permissions for files to allow Read and Write for the apache user, and Read Only for the apache group and for Anonymous users.
sudo find /var/www/html -type f -exec chmod 0644 {} \;Then for directories do the same, but give Read, Write and Execute to the apache user, while the apache group and and Anonymous users get Read and Execute.
sudo find /var/www/html -type d -exec chmod 0755 {} \;SELinux exists to protect your system from unauthorized changes. It also exists for less reputable how-to guides to tell you to turn it off when it gets in your way. The correct thing to do is to tell SELinux when what you’re doing is intentional and to not get in the way in this instance.
The following command will give httpd read and write on the contents of the /var/www/html/ folder and cascading recursively for every file and folder within.
sudo chcon -t httpd_sys_rw_content_t /var/www/html/ -RGetting somewhere...
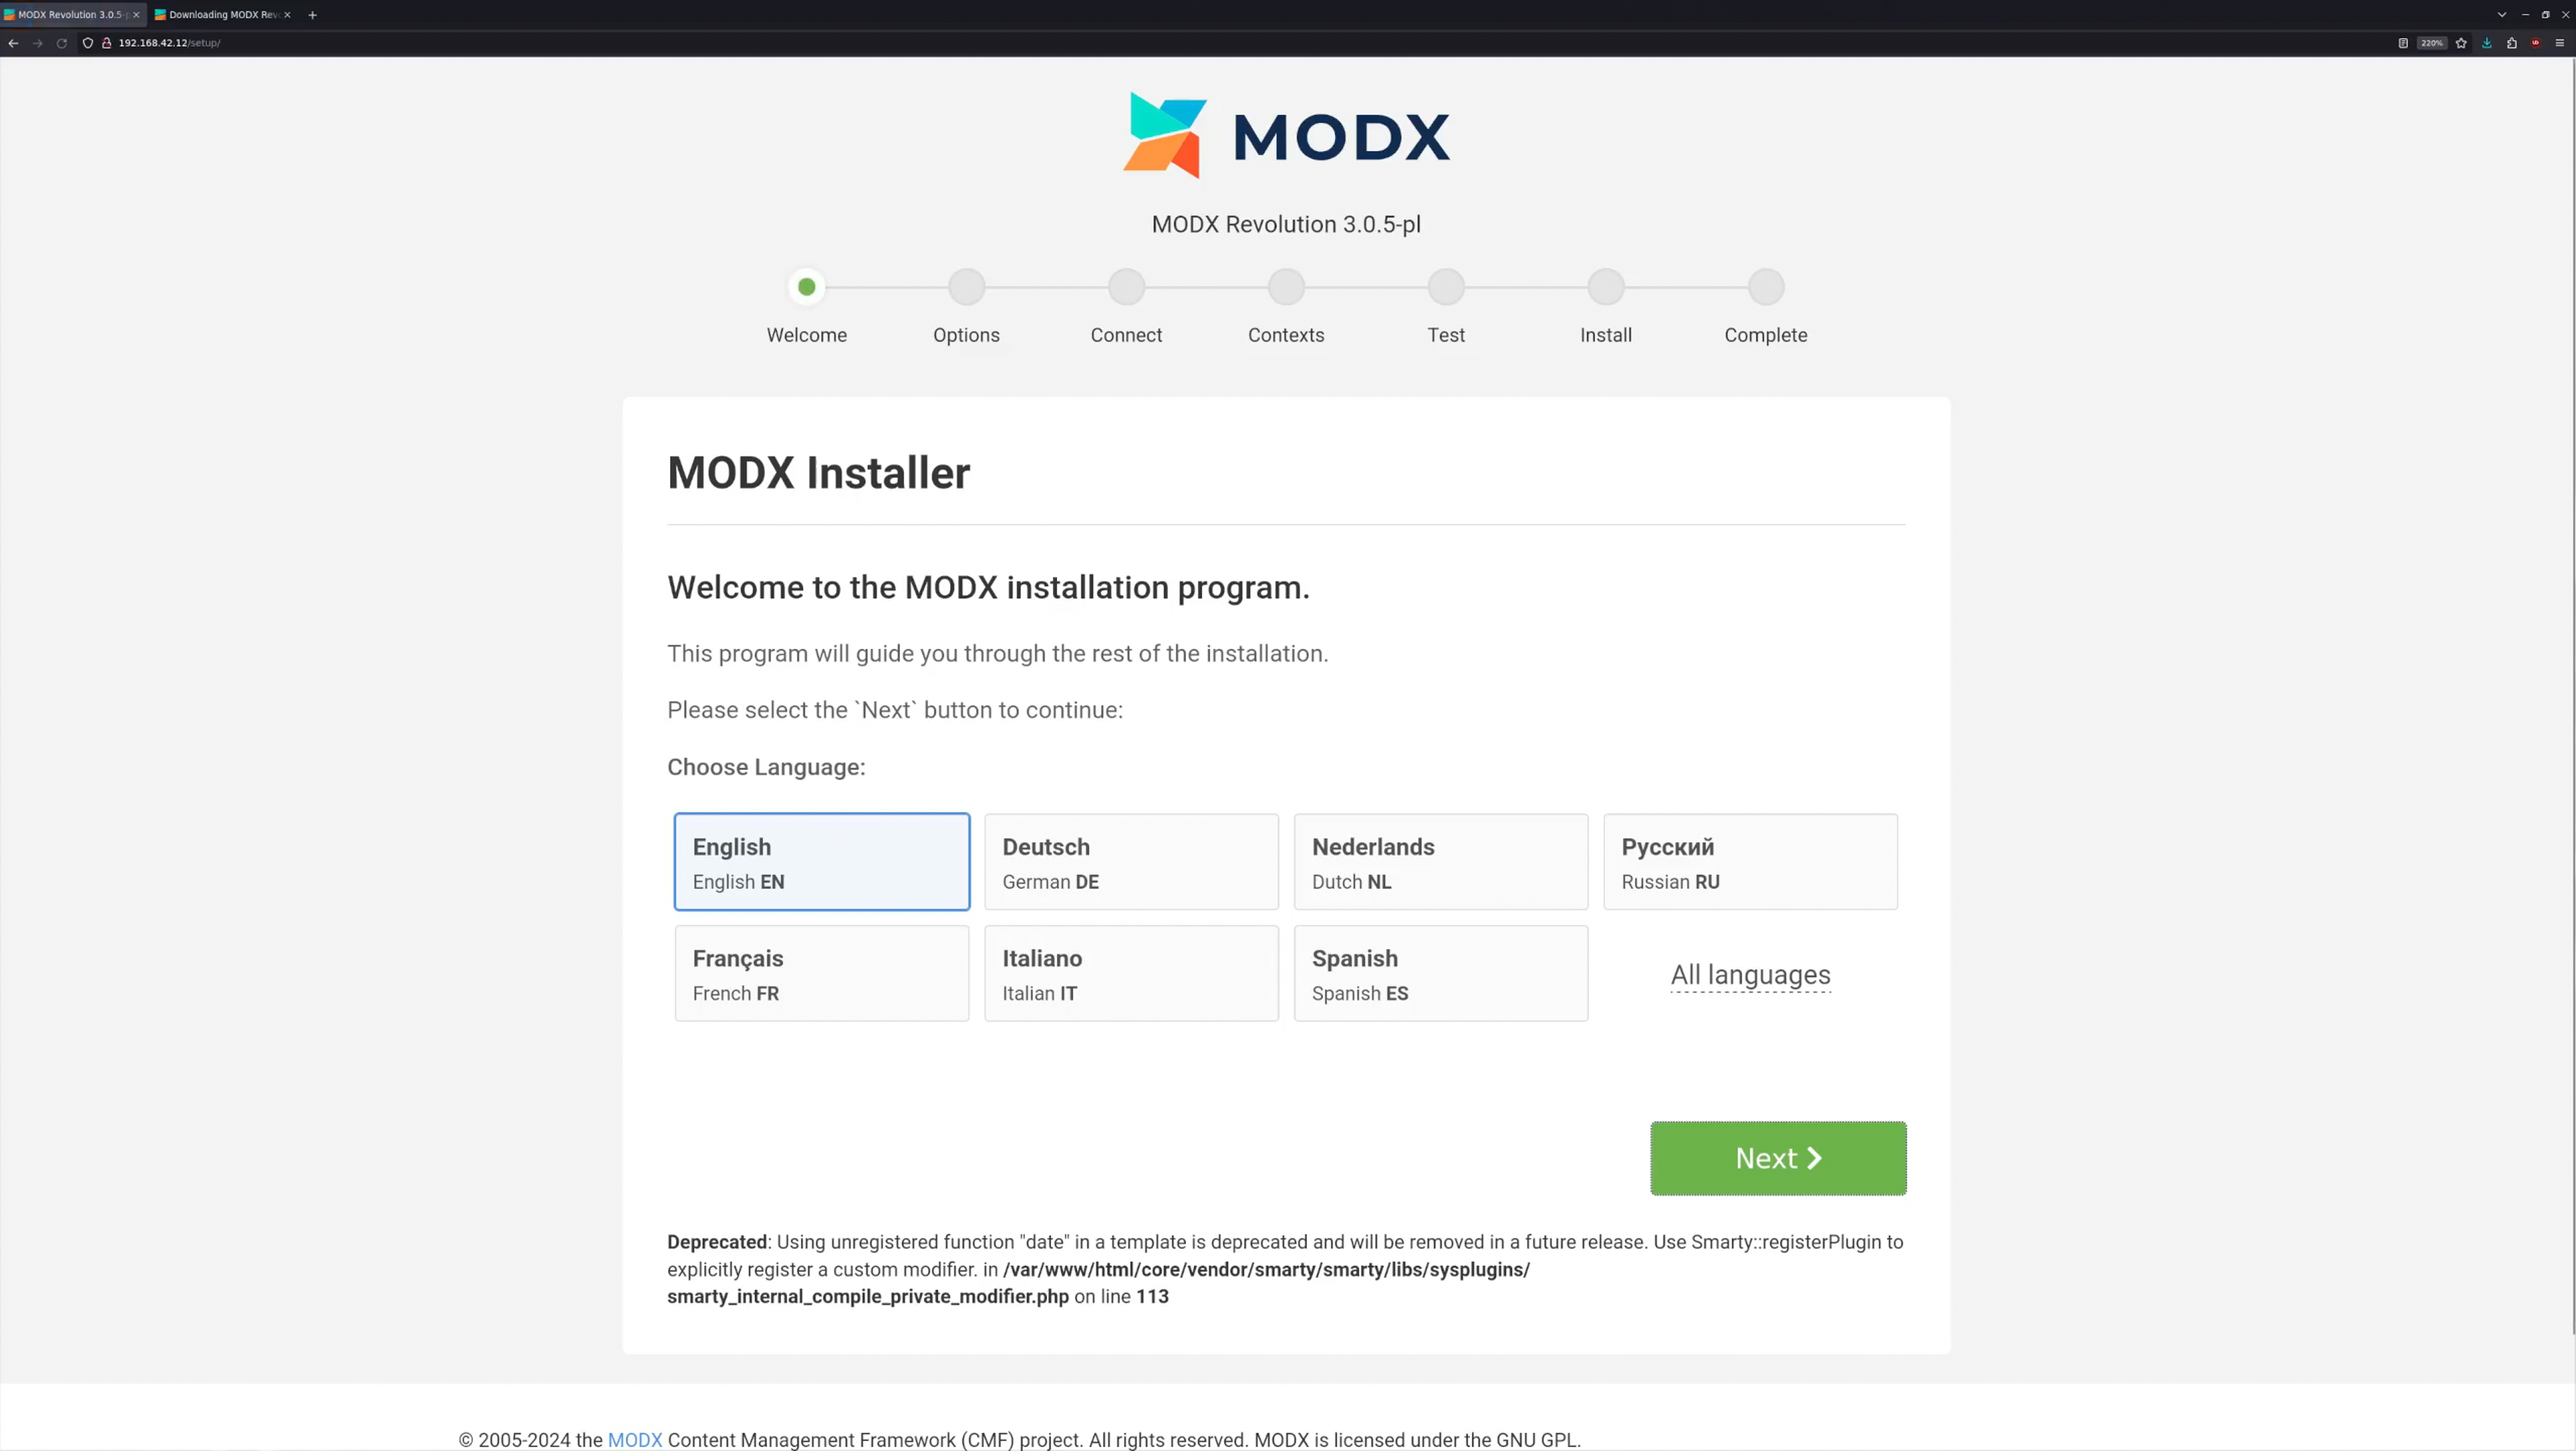
In your web browser, navigate to http://ip_address/setup go through the steps for a new installation.
Fill in the information for the database that you set up previously.
- Database type:
mysql - Database host:
localhost - Database name:
demo_ginge_red - Database login name:
demogingered - Database password:
uniqueGeneratedPassword - Table prefix:
modx_
Clicking “Test” should return “Success!”
You'll now enter the character set and collation used for the database tables. utf8mb4 and utf8mb4_general_ci respectively are preferable in most cases, and what I would recommend.
- Connection character set:
utf8mb4 - Collation:
utf8mb4_general_ci
Clicking “Test” should return “Success!”
Enter Default Admin User information that you’d like to use to login to the Manager (should be different from your database username/password), and click “Next” to continue.
If all green, click “Install” to continue.
You may be prompted to check your session.gc_probability and session.gc_divisor settings. The typical default is 1/100 respectively, however when I installed php:remi-8.3 it came with 1/1000. What this does is calculate the odds of triggering garbage cleanup on the database when initiating a session. Heavily utilized databases may find lower odds (1/1000) more efficient, less utilized databases may find higher odds (1/100) more effective keeping their database size from overgrowing. In my case, I adjusted the session.gc_divisor to 100 as not many people will be connecting to the database.
Leave “Check this to DELETE the setup directory from the filesystem.” checked, and click “Login” to redirect to http://ip_address/manager, where you can now log in.
Before logging in, I recommend on the server renaming the ht.access file in the core directory:
sudo mv /var/www/html/core/ht.access /var/www/html/core/.htaccessThis will make the core files inaccessible externally without user authentication, protecting your site from bad actors changing or modifying MODX core components.
SELinux, Extras and PHPMailer
SELinux can be a barrier to HTTPD for installing MODX Extras and sending email. To see if HTTPD can download Extras, run the following command.
getsebool httpd_can_network_connectIf it returns a 0 or httpd_can_network_connect --> off then MODX will not be able to download Extras.
This isn’t ideal, as it means you’d have to manually install and update Extras, or only write your own.
Changing the setting to a 1 will allow HTTPD to make network calls, which will allow MODX to download Extras.
sudo setsebool -P httpd_can_network_connect 1Similarly, you’ll likely want MODX to be able to send email for password resets, web forms, and any reports you may have automated.
Again, if the following returns a 0 or httpd_can_sendmail --> off SELinux is currently blocking HTTPD from sending email.
getsebool httpd_can_sendmailTo change this to permit sending email, run the following command.
sudo setsebool -P httpd_can_sendmail 1Excellent- MODX can now both connect to the web and send emails. Now you’ll want to install some Extras, set up MODX for email, and test sending an email.
MODX Extras, and Testing SMTP
To first test installing Extras, in the MODX manager navigate to Extras → Installer.
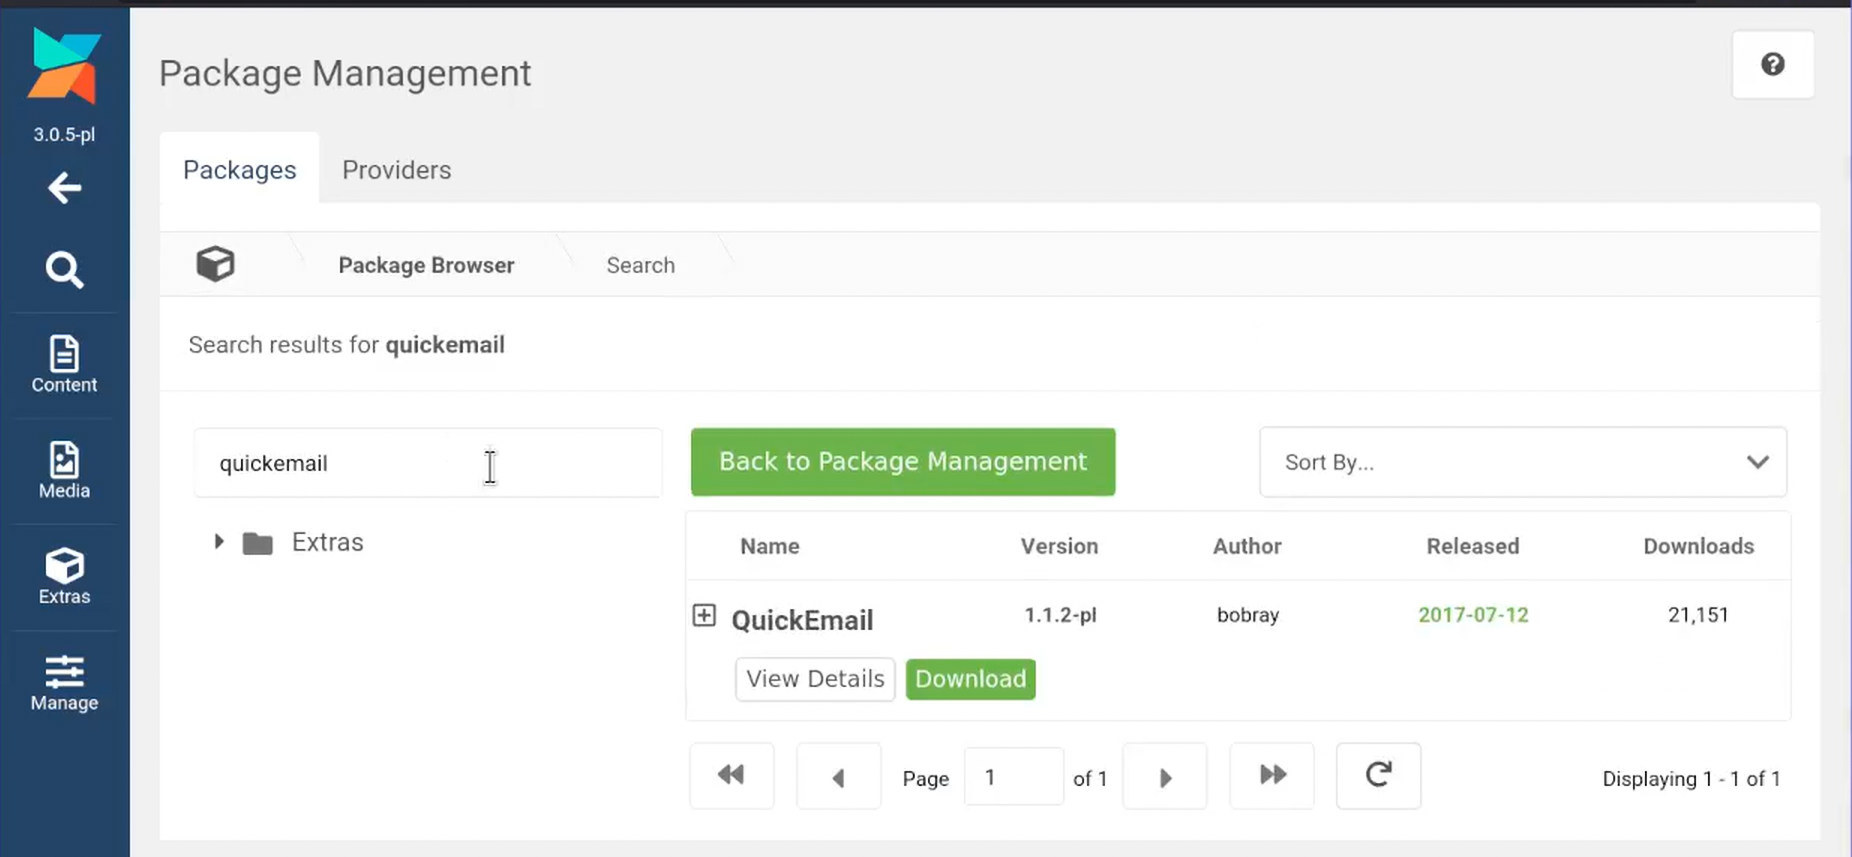
Click on ‘Download Extras’ and if Extras are listed then httpd_can_network_connect is set correctly and your web host has internet access.
Search for quickemail in the Package Management search box, then click “Download” under QuickEmail.
Go back to the list of installed packages and click “Install” under “QuickEmail” to make it functional.
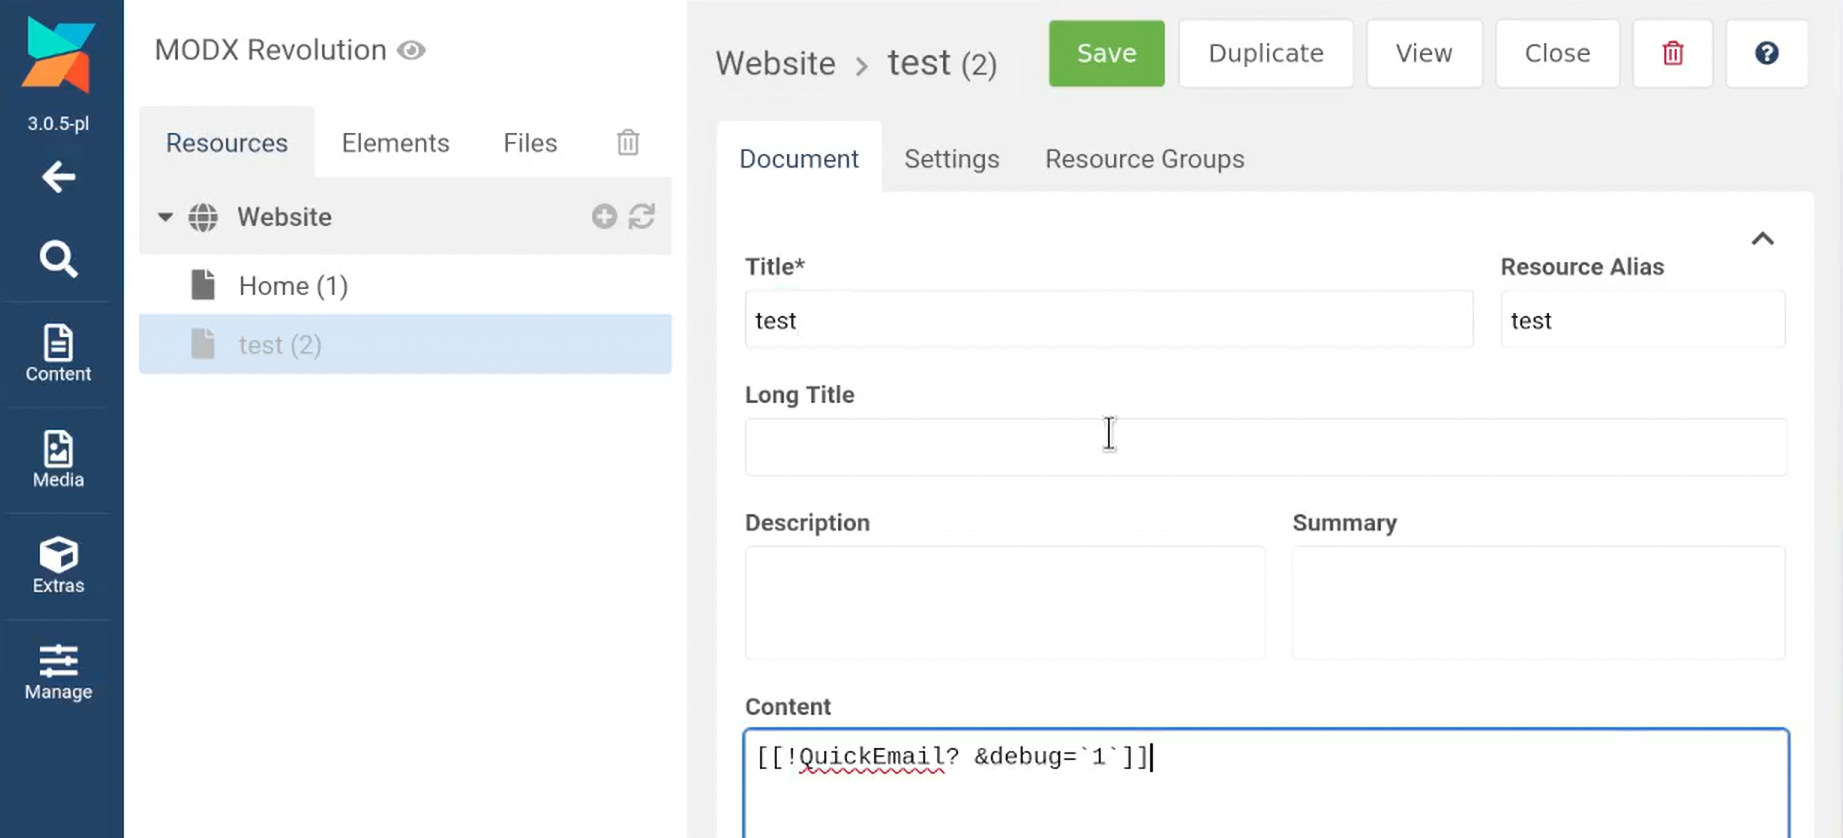
On a new “test” page, create a page with an (empty) template. Do not publish this page, you will be able to preview it while signed into the manager.
In the Content section add [[!QuickEmail? &debug=1]] and click “Save”.
If you preview the page you should see it errors sending an email. You haven’t set your SMTP settings yet, let’s remedy that.
Under the gear, go to System Settings & Events. In the Search box, search for “smtp” to find the settings for sending email.
You’ll need an email account for sending email authenticated over the web. This account shouldn’t be your own email account, and should have a strong and secure password. If you have an email provider for your domain, such as https://ionos.com, create a separate email account for sending automated messages (such as noreply@domain.com), or better yet a separate email specific to the website/service to differentiate where the emails are sending from. If you set up multiple hosts or services this can help accelerate identifying compromised or noisy systems sending too much email. I will use Ionos for my example, you’ll need to check your email provider’s settings for sending authenticated emails.
Enable Authentication:
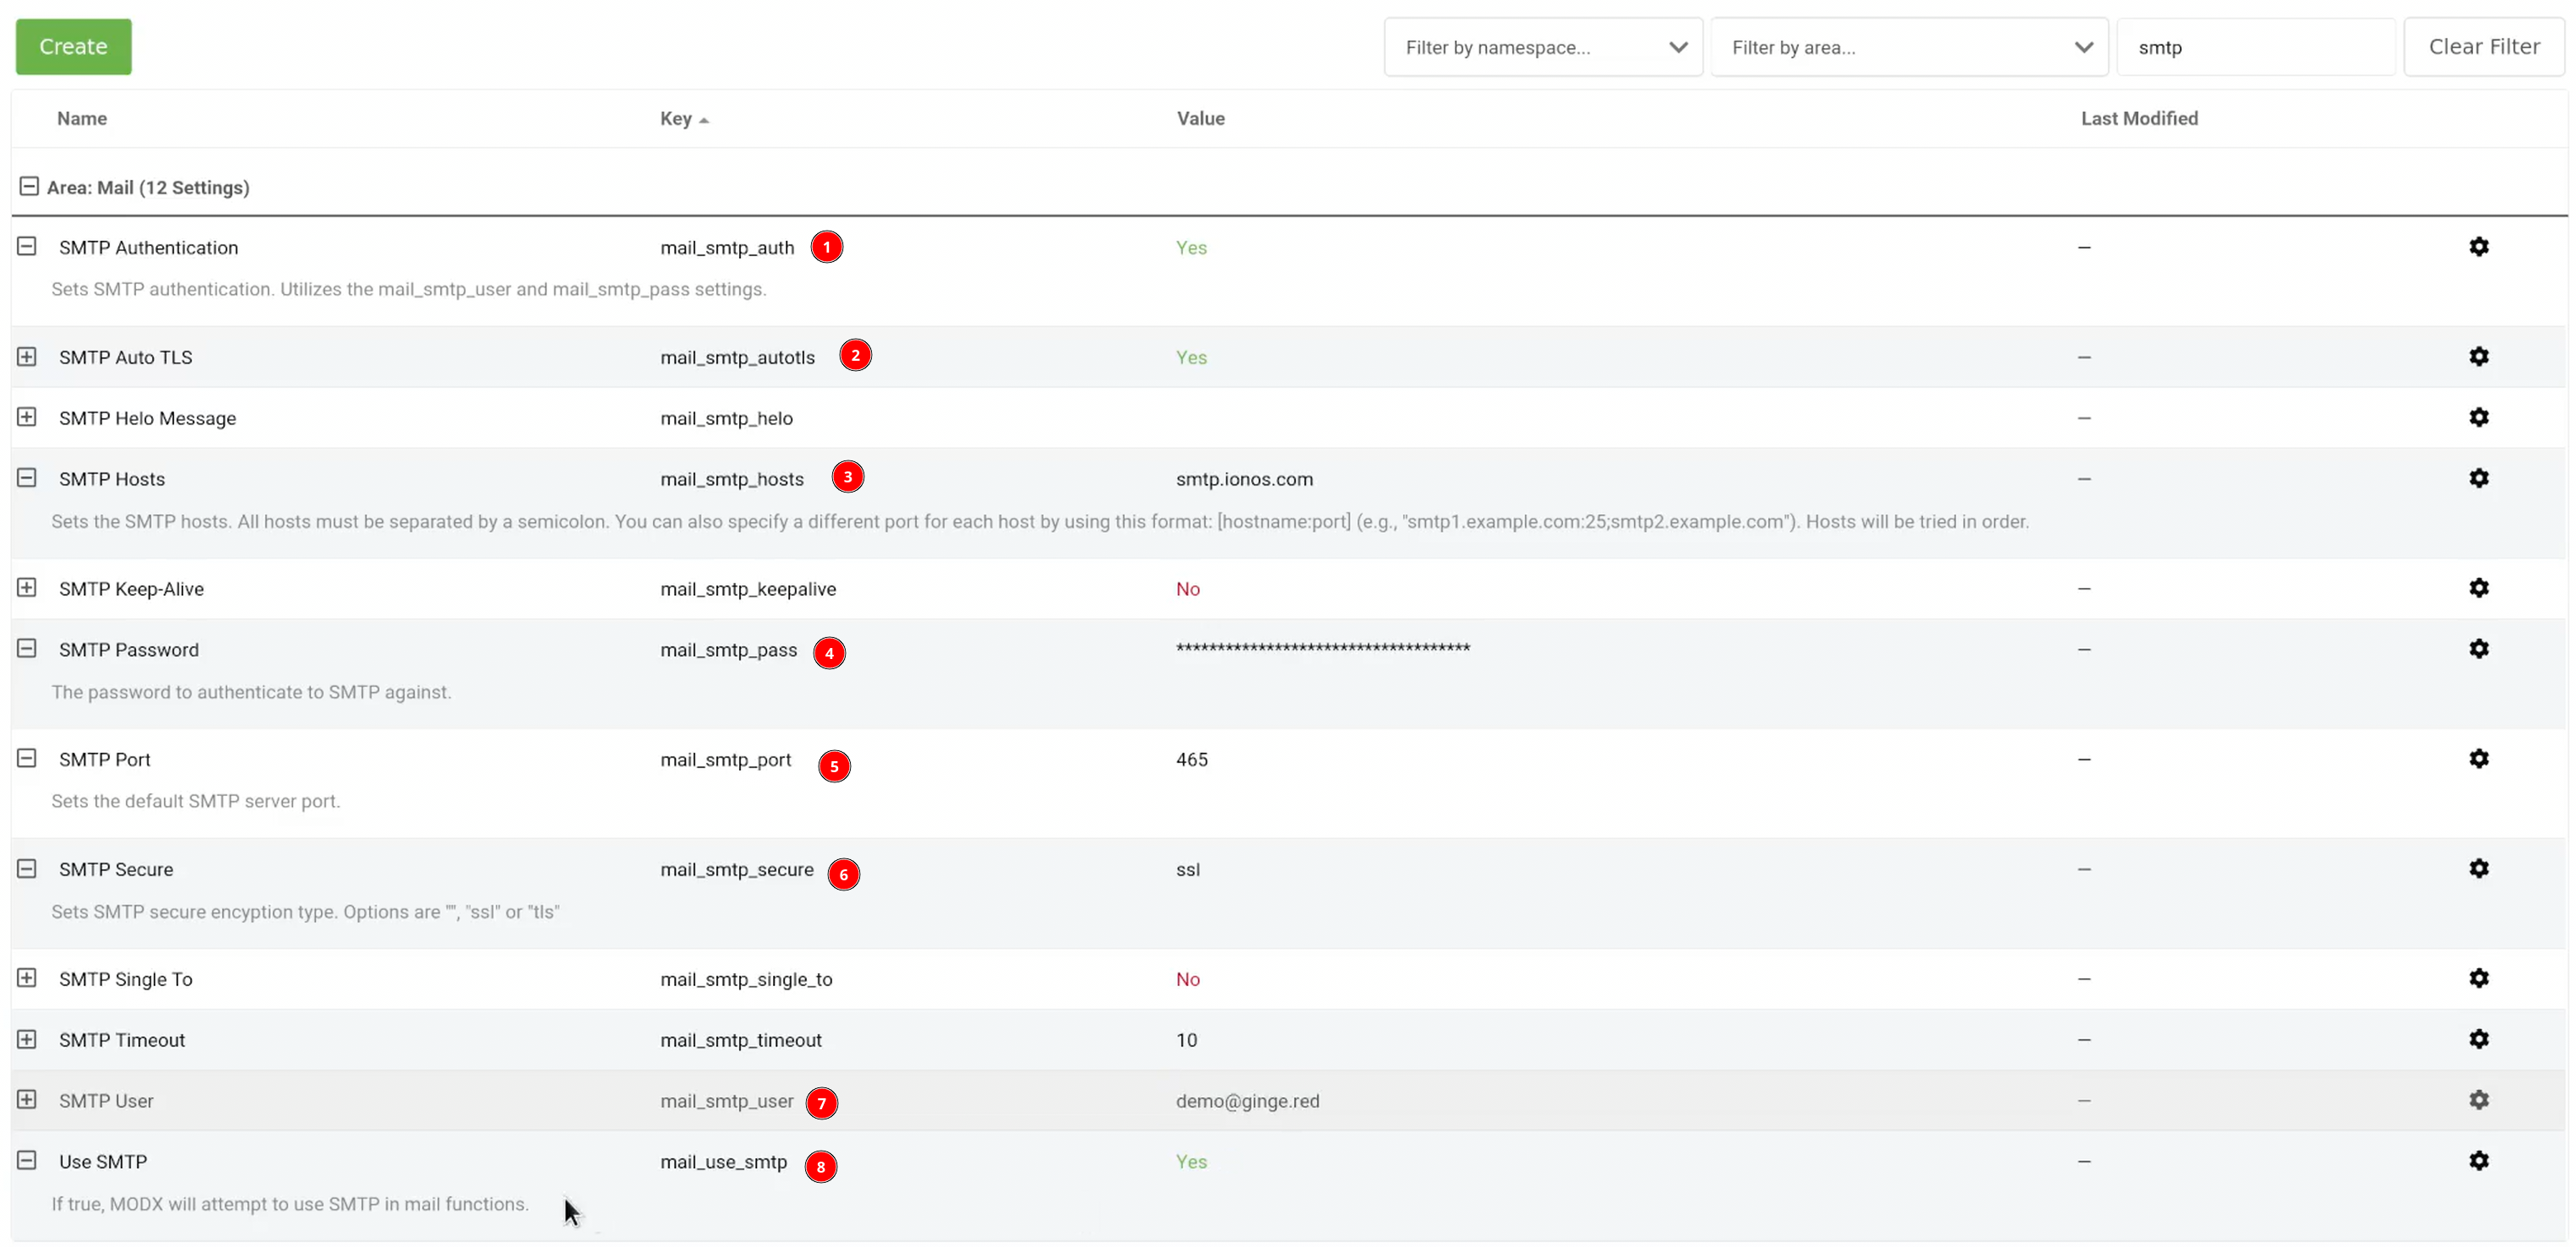
SMTP Authentication: YesSMTP Auto TLS: YesSMTP Hosts: smtp.ionos.comSMTP Password: <password>SMTP Port: 465SMTP Secure: sslSMTP User: <email_address>Use SMTP: Yes
Ideally your email host will authenticate over TLS, however if it cannot it should authenticate over SSL. Setting Auto TLS to Yes will facilitate TLS if available, however if it cannot authenticate on TLS then it should fall back to SSL by setting Secure to ssl.
Preview your test page again and you should see it sent a test email to/from the account set in the SMTP User field.
Get Friendly
Friendly URLs offer a cleaner and simpler URL for your visitors to be able to identify exactly what the purpose of the web page is at a glance from the URL. For example, instead of http://{server_hostname}/index.php?id=2 you can view the page http://{server_hostname}/test.
To make this happen, first you need to rename the ht.access file in /var/www/html to .htaccess.
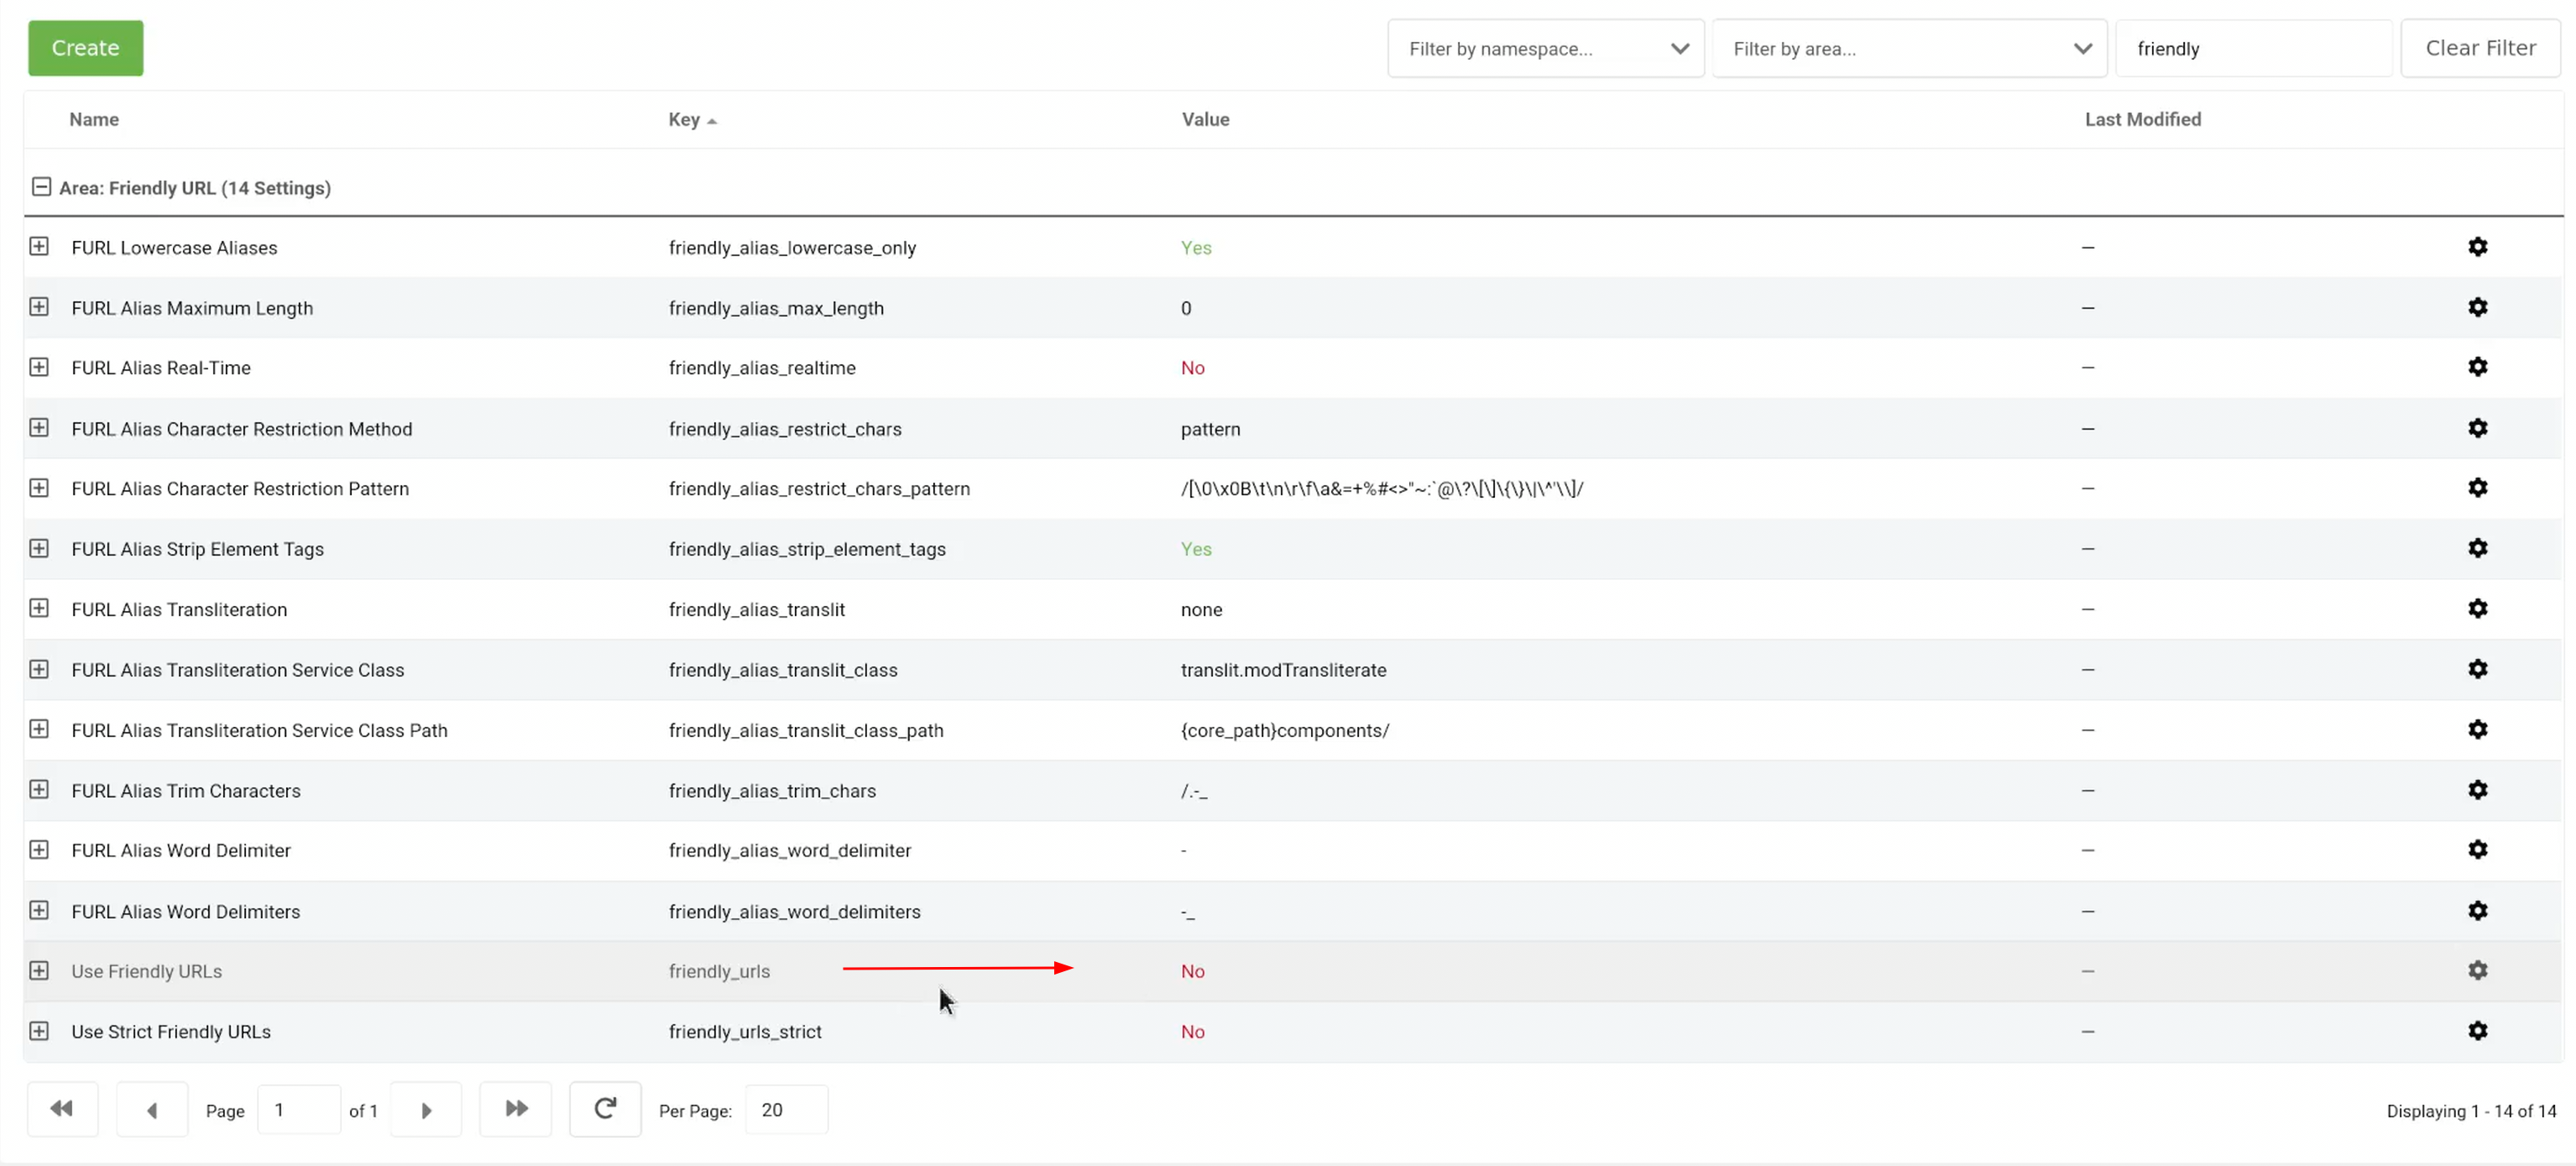
sudo mv /var/www/html/ht.access /var/www/html/.htaccessNext, in the System Settings in MODX change the friendly_urls key to Yes and clear the cache by choosing Manage→Clear Cache (I also suggest doing a Manage→Clear Cache→Refresh URIs).
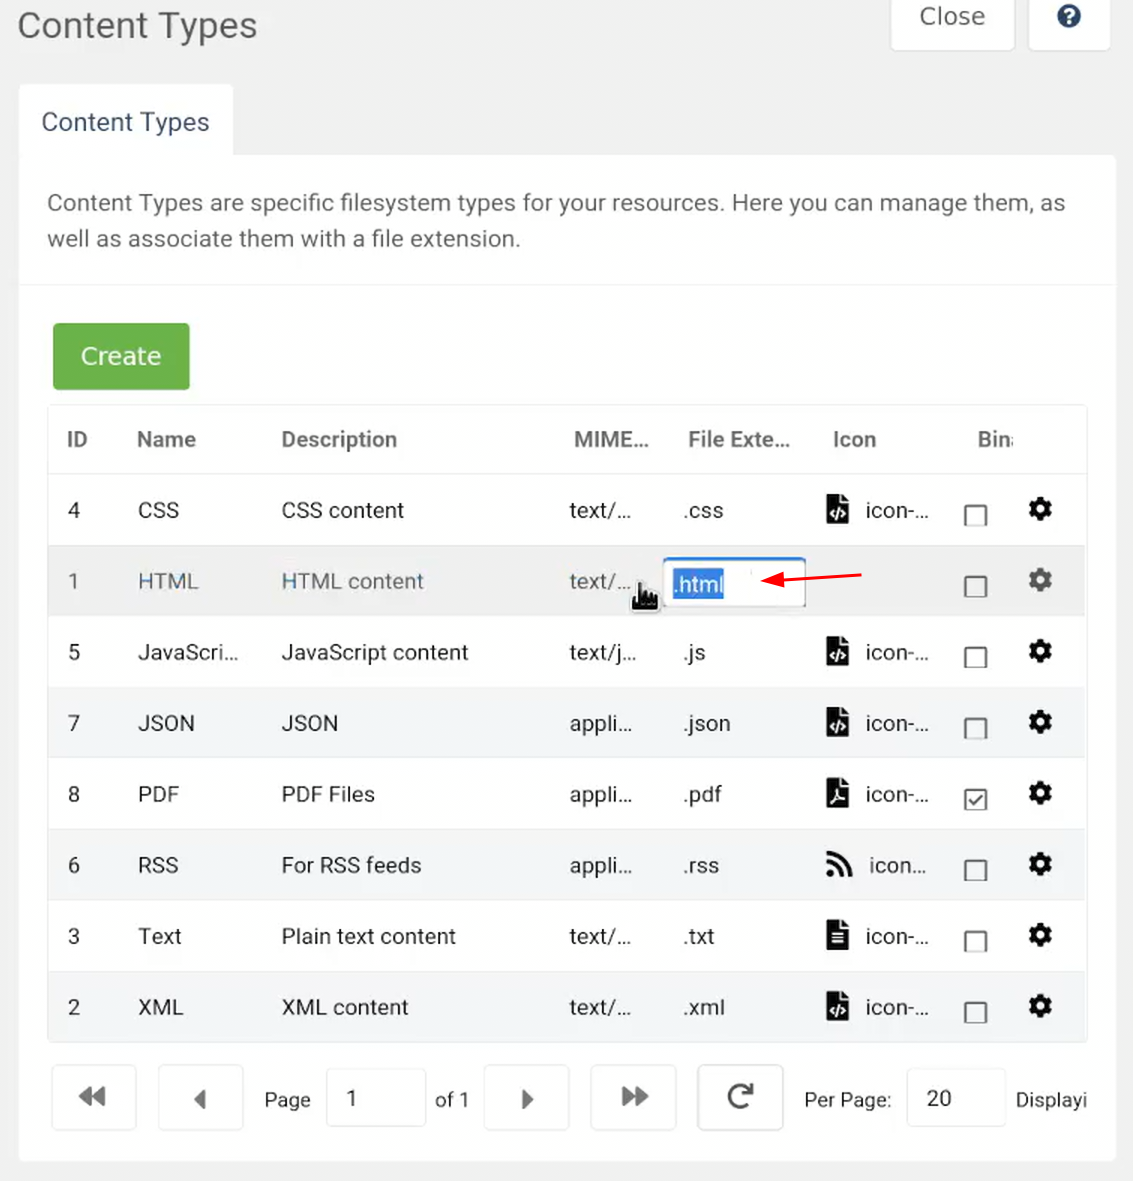
You're nearly there, the test should be visible on http://{server_hostname}/test.html. We don't want the .html as it isn't quite as clean as we want it to be, so in the Content→Content Types delete the File Extension for HTML. Click out of the File Extension field for the update to apply and the test page should now be visible at http://{server_hostname}/test.
Summary
Congratulations, you’ve set up your personal host or VPS as a LAMP server that does not compromise on SELinux security, completed a base installation of MODX, and now you’re ready to build your website using one of the most flexible CMS available.
From start to finish setting up Alma Linux for webhosting and adjusting for MODX functionality takes less than 30 minutes given good documentation. Without good documentation the process is disjointed and painful to troubleshoot. I hope you found this guide useful, and happy hosting!
